One of GovEagle's core capabilities is using your past content to influence and draft new proposals. Teams can bring content into GovEagle by uploading files manually, connecting to SharePoint, or connecting to other knowledge management solutions.
This guide covers how to connect SharePoint to GovEagle from an IT perspective. Before getting started, here are a few things to know:
GovEagle supports Commercial, GCC, and GCC High SharePoint tenants.
You can connect to multiple SharePoint sites or document libraries within the same tenant, or even across different tenants.
GovEagle can connect to both commercial and government tenants within the same instance.
GovEagle syncs with your SharePoint every night to pull the latest snapshot of your content.
GovEagle connects to SharePoint using a Service Principal managed by your IT team. During setup, your team registers an application in Microsoft Entra ID, grants Microsoft Graph application permissions, and provides the tenant ID, client ID, and client secret to GovEagle.
GovEagle uses application permissions rather than delegated user permissions. This allows GovEagle to sync SharePoint content automatically each night without depending on an individual user's login session.
Service Principal Setup
The Service Principal method involves two parts: registering an app in Microsoft Azure, then connecting that app to GovEagle. During setup, you'll choose one of two permission levels depending on how much control your IT team wants.
Requirements
You must have access to Azure Portal and the ability to create app registrations.
You must be able to grant admin consent for API permissions in your Azure tenant.
You must have a GovEagle Admin account.
Part 1: Create an App Registration in Azure
Step 1: Register the Application
Go to the Azure Portal (or portal.azure.us for GCC High tenants) and navigate to Microsoft Entra ID → App registrations → New registration.
Give the application a name (e.g., "GovEagle SharePoint Integration").
Select the appropriate supported account type for your organization.
Click Register.
.png)
Step 2: Create Client Credentials
Choose how GovEagle will authenticate to SharePoint: a client secret (default) or a certificate (required for Inherited permissions).
Option A: Client secret
In your new app registration, navigate to Certificates & secrets.
Click New client secret.
Add a description and set an expiration period.
Click Add, then immediately copy and save the secret value — you will not be able to see it again.
Option B: Certificate (required for Inherited permissions)
Generate a certificate and key with the commands below, then upload the certificate under Certificates & secrets → Upload certificate. You will provide certificate.crt and privatekey.key to GovEagle in Part 2.
openssl genrsa -out temp.key 2048
openssl pkcs8 -topk8 -inform PEM -outform PEM -in temp.key -out privatekey.key -nocrypt
openssl req -new -key privatekey.key -out request.csr
openssl x509 -req -days 365 -in request.csr -signkey privatekey.key -out certificate.crt
rm temp.key request.csr
.png)
Step 3: Configure API Permissions
Navigate to API permissions in your app registration, then click Add a permission → Microsoft Graph → Application permissions.
Select Sites.ReadWrite.All
Allows users to setup a bidirectional sync on each opportunity (Opportunity Assets) within GovEagle.
When a SharePoint folder is connected to an opportunity, GovEagle can use that folder as a bidirectional working space: it can create subfolders, upload generated or templated files directly into SharePoint, and sync supported folder and file updates back to SharePoint.
Allows GovEagle to list available SharePoint sites in the UI so admins can browse, select sites, and choose individual document libraries to sync.
Click Add permissions.
Click Grant admin consent for your organization and confirm.
.png)
Once approved by an administrator, GovEagle can list all SharePoint sites, allow users to browse and select sites directly in the UI, and sync documents without additional IT involvement.
You're done with Azure setup — skip ahead to Part 2.
Need inherited permissions?
To mirror each user’s existing SharePoint access (Inherited from SharePoint mode), grant these additional Microsoft Graph application permissions:
Sites.FullControl.All,Files.ReadWrite.All,User.Read.All,GroupMember.Read.All,Member.Read.Hidden, andReports.Read.All. This also requires certificate authentication and SSO. See Permission Modes below.
Need fewer permissions?
See FAQ below.
Part 2: Connect in GovEagle
Log in to GovEagle at app.goveagle.com.
Click on the Profile icon at the bottom left → Settings → Integrations.
Click Add Integration at the top right, then select Microsoft SharePoint.
Enter your Azure Tenant ID (Directory/tenant ID from the app registration overview). If connecting to an Azure Government (.gov) tenant, toggle Government Cloud on.
Enter your Client ID (Application/client ID).
Choose an Authentication Method:
Client Secret: paste the secret value you saved earlier.
Certificate (required for Inherited permissions): upload your
certificate.crtandprivatekey.key, or paste the PEM contents (see Step 2 to generate them).
Optionally, enter a Tenant Name (e.g., "Main Tenant" or "Production") to help identify this connection.
Under Permissions Mode, choose GovEagle-managed or Inherited from SharePoint (see Permission Modes).
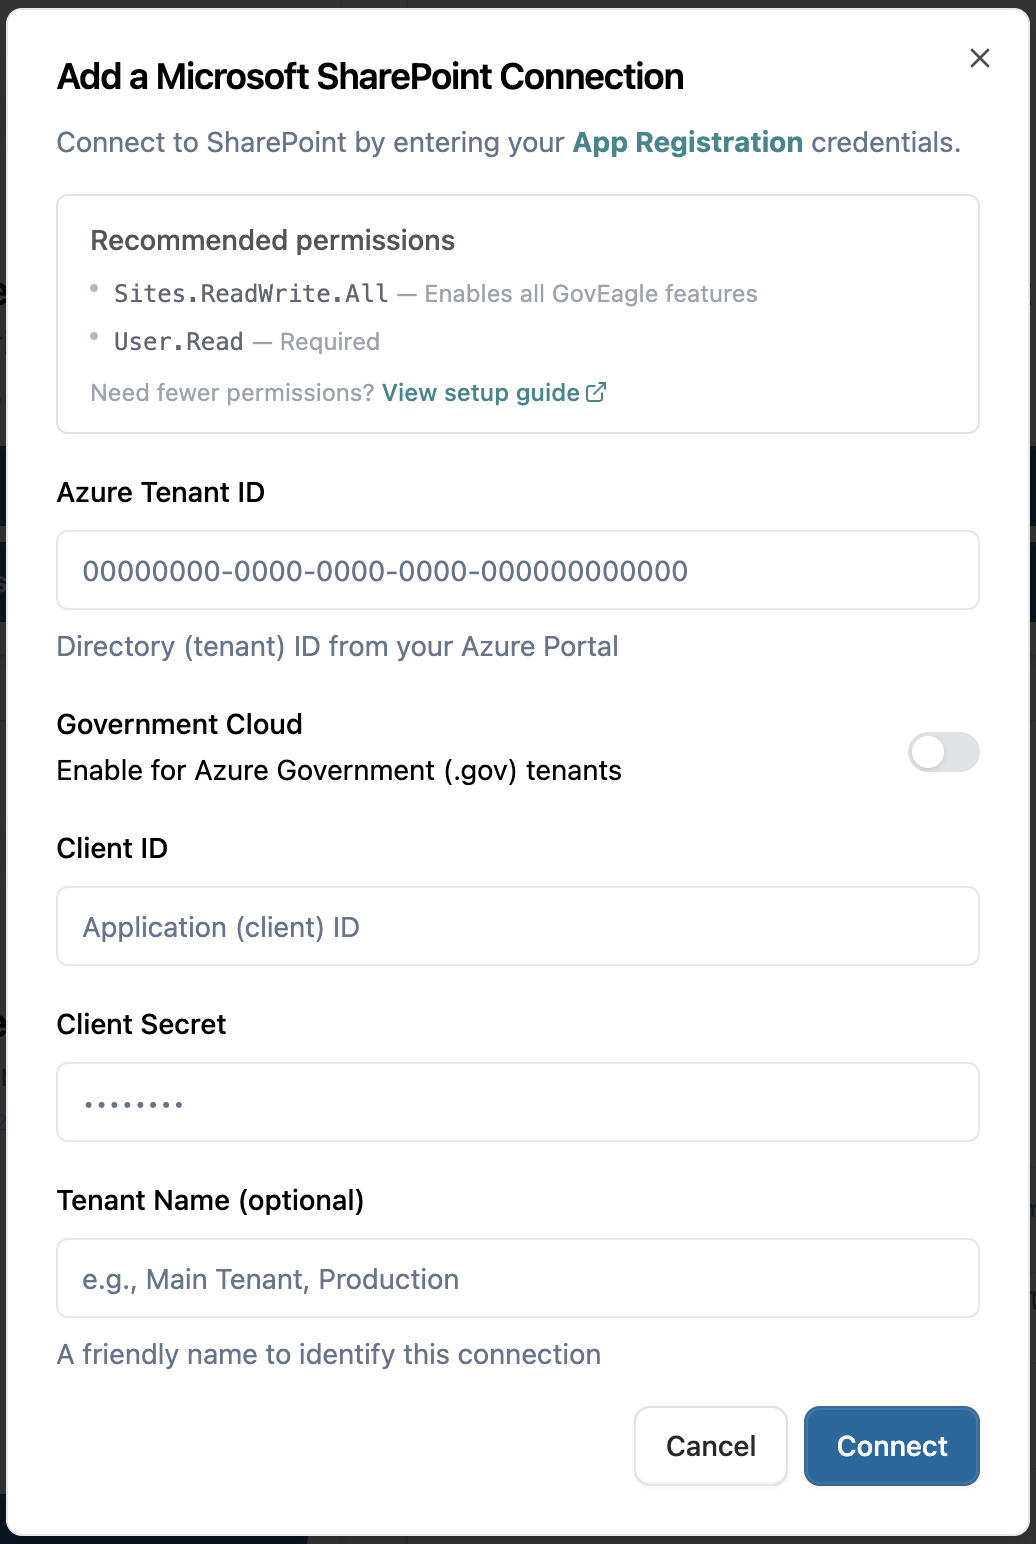
Click Connect.
Click Manage Drives to configure which sites and document libraries you want to sync.
.png)
Select the sites you want GovEagle to ingest. You can click the arrow at the end of each row to select individual document libraries rather than entire sites.
To configure SharePoint metadata tags, see SharePoint Metadata Tags.
Click Resync to begin your first SharePoint sync or to resync your content at any time.
Managing Your Connection
Once connected, you can manage your SharePoint integration from the Integrations page in Settings:
Manage Drives — Add or remove synced sites and document libraries.
Resync — Trigger a sync of the content that is connected to GovEagle.
Permission Modes
When you connect SharePoint, you choose how document access is controlled after syncing.
GovEagle-managed. You control who can access synced documents by configuring permissions in GovEagle. All SharePoint-synced content is shared org-wide unless you restrict it.
Inherited from SharePoint. Permissions are synced from SharePoint automatically. Users see exactly the content they already have access to in SharePoint, with no manual setup. GovEagle resolves SharePoint site groups and user membership to mirror access.
Inherited mode requires all three:
Microsoft Entra ID (formerly Azure Active Directory) SSO configured for the same tenant. See Setting up Single Sign-On (SSO).
Certificate authentication (not client secret).
The expanded permission scopes listed in Step 3.
FAQ
Can I use more restrictive permissions to setup SharePoint?
Option 1: Sites.Read.All
Allows GovEagle to list available SharePoint sites in the UI so admins can browse, select sites, and choose individual document libraries to sync.
GovEagle will function normally but opportunity asset connections will be read-only.
Option 2: Sites.Selected
Limits GovEagle to only the SharePoint sites your IT team explicitly approves.
Sites will not automatically appear in GovEagle. Instead, your IT team must grant the app access to each site and new sites must be approved individually before they can be connected.
Only choose this option if your organization requires site-by-site approval and tighter control over what your application can access.
For the content library sync into GovEagle, read access is sufficient. If your organization plans to use Opportunity Assets, use the corresponding write permission model instead.
To learn more about the Sites.Selected option, please see Granting Per-Site Permissions in SharePoint.
Note:
With Sites.Selected, an IT admin grants GovEagle access to each SharePoint site individually. Inherited permissions are not available with this option, and the Assets tab works only for the sites you have granted.
What's the difference between Sites.Read.All and Sites.Selected in the Service Principal method?
With Sites.Read.All (or Sites.ReadWrite.All), GovEagle can automatically list all your SharePoint sites in the UI so users can browse and select which ones to sync. With Sites.Selected, sites don't appear automatically — an IT admin must manually grant access to each site through Microsoft Graph Explorer before it becomes available in GovEagle. Sites.Read.All is easier to set up; Sites.Selected offers tighter control.
Can I connect to both Commercial and Government tenants?
Yes. GovEagle supports connecting to both commercial and government tenants within the same instance.
How often does GovEagle sync with SharePoint?
GovEagle syncs with your connected SharePoint sites every night to pull the latest content.
Can I select individual document libraries instead of full sites?
Yes. When selecting content to sync, click the arrow at the end of any site row to expand it and select individual document libraries.
Can GovEagle mirror SharePoint permissions so users can only access content they're already authorized to see in SharePoint?
Yes. Use Inherited from SharePoint permissions mode, which mirrors each user’s existing SharePoint access. See Permission Modes for setup and prerequisites.